
TL;DR
Moving your rig out of your workspace into another room is the most effective way to cut noise. When that’s not possible, proper placement, sealing gaps, and ventilation are key. Focus on distance first—soundproofing comes after.
Ever notice how a loud rig can turn your quiet home office into a buzzing chaos? You’re not imagining it. The real secret to silence isn’t just slapping foam on the walls—it’s about where you put your gear and how you isolate it.
In this guide, you’ll learn why distance beats absorption, how to set up a ‘rig in the closet,’ and the one trick that transforms a noisy machine into a silent workhorse. Whether you’re building a tiny vocal booth or just want a quieter workspace, these practical tips will save you both time and money.
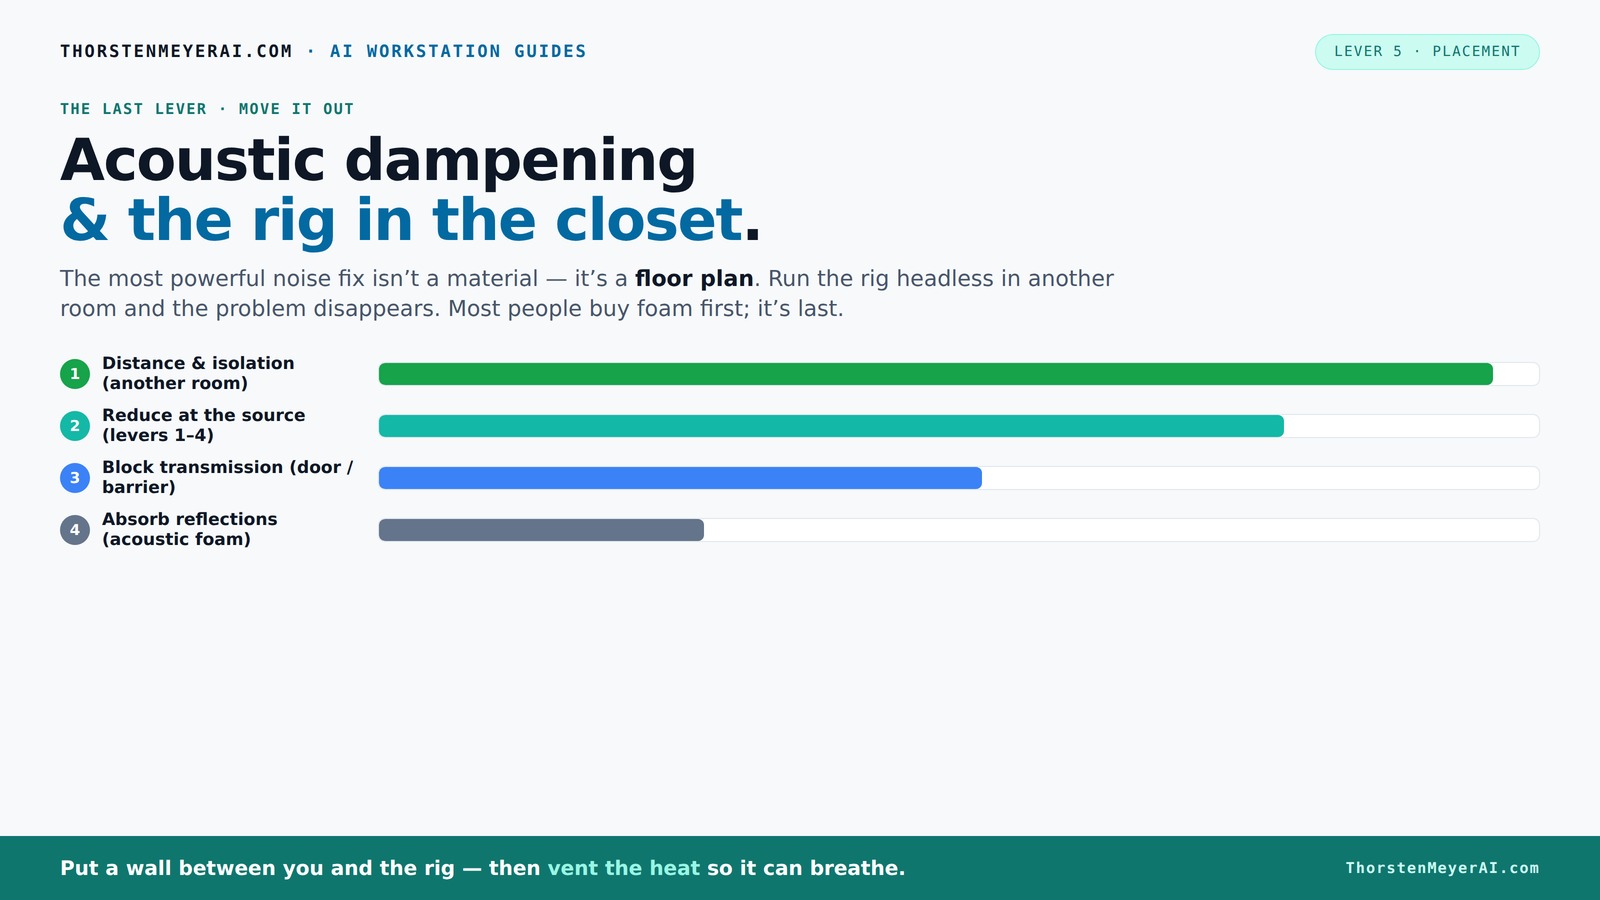
Acoustic dampening
& the rig in the closet.
The most powerful noise fix isn’t a material — it’s a floor plan. A rig you can’t hear because it’s in another room beats any amount of foam. Tap the approaches in Part 1 to see what actually works.
(another room)
(levers 1–4)
(door / barrier)
(acoustic foam)
Contain the noise, not the heat
Key Takeaways
- Moving your rig into another room or closet can reduce noise by over 90%, often more than foam panels.
- Effective closet setups require proper ventilation—passive vents or quiet exhaust fans prevent overheating and maintain safety.
- Sealing gaps and upgrading to solid-core doors significantly improve sound isolation.
- Place acoustic treatment at reflection points—behind the mic, on the ceiling, and near hard surfaces—for maximum effect.
- Combine sealing, mass, and absorption for the best balance of quiet and cool operation.

Focusound 52 Pack Acoustic Foam Panels 1" x 12" x 12" Sound Proof Foam Panles Soundproofing Noise Cancelling Wedge Panels for Home Office Recoding Studio with 300PCS Double-Side Adhesive
Soundproofing - Acoustic foam panels triangular grooves structure for better noise absorption, helps to reduce and absorb unwanted...
As an affiliate, we earn on qualifying purchases.
As an affiliate, we earn on qualifying purchases.
Why Distance Is the Most Powerful Noise Fix You Can Do
When it comes to reducing noise, the best move is simple: put space between you and the source. Imagine a loud computer tower in the next room versus on your desk. The distant one is almost silent to you.
According to experts, moving a machine into another room cuts noise by up to 90%—much more than foam or panels ever could. This is because sound waves weaken with distance, and obstacles like walls and doors add further protection.
For an AI rig, you don’t even need it nearby. A rig in a closet or basement connected via Ethernet can be just as effective—your workflow remains unchanged while noise disappears.

VEVOR Portable Vocal Booth, 6.56 ft Height, Portable Recording Studio with Travel Bag, Mobile Tablet Stand, Thickened Soundproofing, Sound Isolation Booth for Echo-Free Vocals, Podcasts, Voiceovers
Say Goodbye to Echoes: Built with durable Oxford cloth and acoustic padding, this recording booth for the home...
As an affiliate, we earn on qualifying purchases.
As an affiliate, we earn on qualifying purchases.
How to Use a Closet to Quiet Your Rig Without Overheating It
Placing a powerful computer in a closet sounds perfect—except for one thing: heat. Without proper ventilation, trapped heat can turn your closet into a sauna for your machine. That’s a recipe for throttling fans and even hardware damage.
To make a closet both quiet and cool, you need airflow. A simple trick is to add passive vents or a quiet exhaust fan—think of it like giving your closet a pair of lungs. For serious setups, consider a purpose-built soundproof cabinet with temperature controls, which costs more but keeps things safe and silent.
Check out [this guide](https://thorstenmeyerai.com/reduce-heat-noise-ai-workstation/) for detailed ventilation tips and how to manage heat when placing a rig in a closet or cabinet.

118” Wedge-Shape Foam Window Weather Stripping Door Seal Strip,Soundproofing Frame Winter Insulation Tape for Exterior Front Door,Noise Cancelling Window Inserts,Door Gap Filler Light Blocker,White
Upgraded Wedge Design: This window draft stopper features an upgraded wedge design, tapering from 5/32" to 11/32" (0.16"–0.35")...
As an affiliate, we earn on qualifying purchases.
As an affiliate, we earn on qualifying purchases.
Acoustic Treatment vs. Soundproofing: What’s the Real Difference?
Acoustic dampening and soundproofing sound similar but serve different purposes. Acoustic treatment is about inside-room sound—reducing echo, smoothing the tone, and controlling reflections. Soundproofing blocks sound from leaving or entering a space, preventing noise leaks.
For example, foam panels inside a closet absorb echoes but won’t stop your neighbor from hearing the noise. To stop sound escaping, you need dense barriers like sealed doors, drywall with damping compounds, or mass-loaded vinyl.
Here’s a quick comparison:

Professional Studio Recording Microphone Isolation Shield, Pop Filter,High density absorbent foam is used to filter vocal. Suitable for Blue Yeti and other condenser microphones (AO-504 With Stand)
♪【The package contains】♪: Microphone Isolation Shield x 1, Metal Thread Adapter x 2 (Adapt most microphones), Adjustable Stand...
As an affiliate, we earn on qualifying purchases.
As an affiliate, we earn on qualifying purchases.
Where to Place Acoustic Panels for Maximum Silence and Clarity
Placement is everything with acoustic dampening. Start by identifying the reflection points—places where sound bounces first. Use a mirror to find these spots: if you can see your speaker or mic in it from your listening position, that’s where panels belong.
Next, add panels behind your microphone and on the ceiling if space is small and reflective. For a closet, soft materials on walls, ceiling, and door can drastically cut reverb and harshness—turning a echoing cave into a cozy booth.
Remember, in tight spaces, more soft material on all surfaces beats focusing only on corners. Less is often more, especially with about 20–40% coverage depending on your needs.
How to Seal and Isolate a Closet Rig for Better Noise Control
Sealing gaps and adding mass are key to making your closet a quieter zone. Cracks around the door, vents, or electrical outlets act like open windows for sound. Use weatherstripping or acoustic sealant to close these leaks.
Upgrade the door to a solid-core type. If you want real isolation, add an extra layer of drywall with damping glue like Green Glue—this makes walls thicker and less leaky.
Also, hang blankets or moving pads on the door and walls. These absorb reflections and reduce sound transmission. For the best results, combine sealing, mass, and absorbent materials.
The ‘Rig in the Closet’ Setup: Pros, Cons, and Practical Tips
“Rig in the closet” usually means turning a small space into a mini recording booth or quiet zone. It’s cheap, fast, and effective—if you manage heat, leaks, and reflections. Use blankets, foam, and clothing to absorb echoes, and seal gaps around the door. For more detailed tips, see this guide.
For the walls, add soft materials like foam panels or fabric-wrapped insulation. A reflection filter around vocals helps but isn’t enough alone. More advanced builds include drywall with damping compounds and dedicated ventilation.
Remember, this setup works best when combined with strategic placement—treat reflection points, seal gaps, and add ventilation to keep things cool and quiet.
Latest Trends: Combining Portable Materials and Strategic Placement
Today’s DIY advice favors smart, targeted treatment over filling every inch of the space. About 20–40% of wall and ceiling coverage with absorptive materials often does the trick. Portable soft materials like blankets and foam panels are popular for their flexibility. Learn more about effective acoustic treatment at this site.
Creators also focus on placement—treating reflection points, behind microphones, and ceiling surfaces. This approach is cheaper, easier, and more effective for small spaces than massive foam walls.
Remember, most noise issues stem from echoes and direct sound leaks—address those first, and your closet becomes a surprisingly effective booth.
Frequently Asked Questions
Can I just put blankets around my computer to quiet it?
Blankets can absorb reflections and reduce internal echo, but they won’t block sound from escaping or entering. For serious noise control, sealing gaps and adding barriers are necessary. Check out this resource for more tips.How do I stop my closet from overheating?
Add passive vents, exhaust fans, or a dedicated cooling system. Make sure hot air can escape and fresh air can enter—ventilation is key to safe closet setups.Are foam panels enough to soundproof a closet?
No; foam mainly reduces echo and internal reflections. To block sound transmission, you need sealing, mass, and barriers—foam alone won’t stop noise leaks.Where should I place acoustic panels in a small closet?
Start at reflection points—sides, ceiling, and behind the mic. Cover about 20–40% of surfaces for effective dampening without overdoing it.Is a solid-core door necessary for a closet booth?
If leakage is a concern, yes. A solid-core door blocks more sound than hollow ones. Seal around it with weatherstripping for best results.Conclusion
The smartest move isn’t just adding foam. It’s about thinking of noise as a distance problem first—then sealing leaks and managing heat if you go the closet route. A well-placed, ventilated closet can turn a noisy rig into a whisper-quiet workhorse.
Remember: your workspace should serve you, not the other way around. With a little strategy, silence is well within reach.