To avoid hollow audio when using a shotgun mic on your DSLR, keep the mic close to your subject, ideally within a foot or two. Proper distance is key to capturing clear, focused sound and reducing background noise or echo. Position the mic just above or below the subject’s mouth for ideal clarity. Getting this right ensures professional-quality audio every time. Keep exploring to discover more tips that will improve your DSLR sound setup.
Key Takeaways
- Keep the microphone within 1-2 feet of the subject to capture clear, focused audio.
- Position the mic just above or below the mouth for optimal voice clarity.
- Avoid placing the shotgun mic too far, which causes hollow, distant sound.
- Test and adjust the distance before recording to prevent echo and background noise.
- Ensure microphone compatibility with your DSLR to maintain proper placement and audio quality.

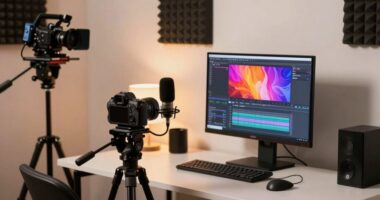
If you’re serious about capturing high-quality audio with your DSLR camera, a shotgun microphone is an indispensable tool. These microphones excel at isolating sound from your subject while minimizing background noise, making them ideal for interviews, vlogs, or any situation where clear audio matters. The key to getting professional sound lies in mastering audio positioning—knowing exactly where to place your mic relative to your subject—and confirming your microphone’s camera compatibility. When you get these elements right, you’ll avoid hollow, echoey audio that can ruin an otherwise great video.
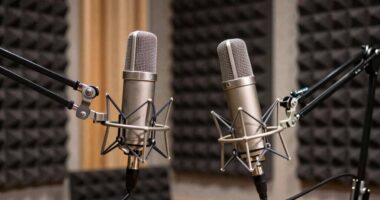
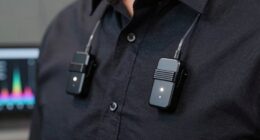
A shotgun mic ensures crisp, focused audio for your DSLR videos.
First, focus on audio positioning. The goal is to get the microphone close enough to your subject to pick up their voice prominently, but without intruding on the shot. Typically, mounting the shotgun mic on your camera’s hot shoe and angling it towards your subject works well, but you might need to adjust based on the scene. For interviews, placing the mic just above or below the subject’s mouth often yields crisp results. Remember, the longer the distance between the mic and the sound source, the more ambient noise and echo you’ll capture, making your audio sound hollow or distant. Keep the mic within a foot or two of your subject for ideal clarity, and always test your setup before recording. Proper placement is essential for achieving clear, professional audio.
Next, consider camera compatibility. Not all shotgun microphones are compatible with every DSLR, so it’s crucial to check if your chosen mic connects via the standard 3.5mm jack or if it requires an additional adapter or audio interface. Some models are designed specifically for DSLR use, offering direct compatibility and simpler setup. Others might need phantom power or specific mounts, so review your camera’s input options carefully. Confirming your mic is compatible avoids frustrating issues like poor connections or unusable audio. When your shotgun mic integrates seamlessly with your camera, you can focus on positioning and technique without worrying about technical hiccups.
Ultimately, mastering the distance rule and understanding your camera’s compatibility makes a significant difference in your audio quality. Proper audio positioning ensures your sound is clear and direct, while compatible gear prevents technical setbacks. When you combine these elements, your footage will sound as professional as it looks, elevating your videos from amateur to polished production. Keep practicing these fundamentals, and you’ll find that capturing crisp, high-quality audio becomes second nature, transforming your DSLR videos into compelling, immersive content.
Frequently Asked Questions
How Do I Choose the Best Shotgun Mic for My DSLR?
You choose the best shotgun mic for your DSLR by prioritizing audio quality and versatile mounting options. Look for a mic with a narrow, focused pickup pattern to reduce background noise and capture clear dialogue. Confirm it’s compatible with your camera’s mounting system, like cold shoes or hot shoes. Consider whether it needs additional accessories, such as windshields or shock mounts, to improve sound quality in various filming environments.
What Accessories Are Essential for Optimal Shotgun Mic Performance?
Imagine you’re a filmmaking wizard from the past, wielding your camera like a magic wand. To guarantee ideal shotgun mic performance, you need essential accessories like sturdy cable connectors to prevent signal loss and shock mounts to reduce handling noise. These accessories keep your audio clear and professional, helping you capture crisp sound even in dynamic environments. Don’t forget these tools; they’re your secret spells for perfect audio every time.
Can Shotgun Mics Be Used Outdoors Effectively?
Yes, you can use shotgun mics outdoors effectively. To do so, make certain your outdoor setup includes a windscreen or dead cat for wind resistance, which minimizes noise and hollow audio caused by wind interference. Position the mic properly, keeping it close to your subject, and avoid capturing unwanted ambient sounds. With the right accessories and setup, your shotgun mic will deliver clear, professional-quality audio even outdoors.
How Do I Prevent Wind Noise With Shotgun Mics?
To prevent wind noise with shotgun mics, you should use proper windshield techniques, like attaching a furry windscreen or dead cat, which substantially reduces wind interference. Additionally, microphone positioning matters—keep the mic close to your subject and angle it away from direct wind sources. Combining these methods ensures cleaner audio, even outdoors, allowing your shotgun mic to capture clear sound without unwanted noise.
What Are Common Mistakes to Avoid When Using Shotgun Mics?
To avoid common mistakes, pay attention to placement errors—keep the shotgun mic aimed directly at your subject, not off to the side. Also, make sure you’re providing the correct phantom power, as insufficient or incorrect power can cause poor audio quality. Don’t forget to check your settings before recording and avoid placing the mic too close or too far, which can lead to hollow or muffled sound. Proper placement and power are key.
Conclusion
So, while the distance rule might seem like a minor detail, paying attention to it can make your audio shine. Think of it as a gentle nudge toward clearer sound, rather than a strict rule set in stone. With a little mindful adjustment, you’ll find your shots sounding richer and more professional—almost effortless. Keep experimenting, stay attentive, and let your sound quality naturally elevate your videos without any unnecessary fuss.